October 2020
10/27/2020 | BY Chris Souder, MD
5 Tips on Preoperative Planning for Lower Extremity Deformity Correction
- By Chris Souder, MD. Central Texas Pediatric Orthopedics, Austin, Texas.
- POSNA Resident Communications Committee
Lower extremity deformities are common presentations in orthopaedic clinics. In order to properly treat these cases, the surgeon must be able to accurately assess the deformity. Deformity analysis consists of a methodical assessment of the limb from hip through the foot. This process begins with a thorough history and physical exam. After this, the surgeon must be able to accurately assess radiographs in order to determine the location of deformity and to guide surgical planning. This article will provide a brief introduction to this process.
Much of the framework for deformity analysis has been described by Drs. Dror Paley and John Herzenberg in their textbooks Principles of Deformity Correction and The Art of Limb Alignment. I would recommend these works to anyone who is interested in learning more about deformity correction.
1. Obtain quality images
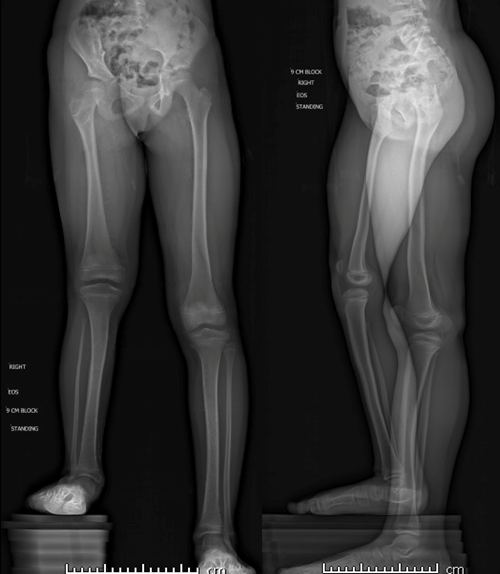
Accurate deformity correction is dependent on appropriate radiographs. Standing radiographs are obtained with conventional XRAY or biplanar EOS techniques. The proper positioning of the patient is critical to accurate assessment of the deformity. The patient must be standing with knees and hips fully extended and with the patellae (not the feet) facing forwards. If a limb length inequality is present, blocks should be placed under the shortened limb to level the pelvis. EOS imaging allows the coronal and sagittal planes to be evaluated simultaneous. This can be helpful in identifying if the patient has flexed the hip or knee while the image was being acquired as it can be difficult to successfully get a small child to stand with knees and hips straight (FIG 1).
.png?lang=en-US "Picture1-(1).png")
Figure 1: Biplanar EOS standing images
Dedicated radiographs of specific joints are often indicated if the deformity is near the joint. Advanced imaging such as computed tomography (CT) or magnetic resonance imaging (MRI) can be used in complex deformities. These axial imaging modalities can also be used to evaluate the rotational profile of the patient. With the appropriate software and a 3D printer, data from CT and MRI studies can be used to build 3D models which can enhances the surgeon’s understanding of complex, multiplanar deformities and allow for mock (Fig 2A + B).


Figure 2A + B: 3D model of Ellis-Van Creveld genu valgum deformity; Model after simulated femoral and tibial osteotomies
2. Analyze the deformity
Deformity analysis starts with evaluation of the mechanical axis deviation (MAD) by drawing a line from the center of the femoral head to the center of the talus.Ideally, the MAD should travel through the center of the knee. The MAD passes medial to the center of the knee in genu varum and lateral in genu valgum.Next, the joint angles are measured for the proximal and distal femur as well as the proximal and distal tibia (Fig 3).

Figure 3: The mLDFA and MPTA
Charts are readily available displaying normal values (Fig 4).

Figure 4: Normal lower extremity joint angles; Photo courtesy of Rubin Institute for Advanced Orthopedics, Baltimore, MD.
This allows one to identify whether the deformity is within the tibia or the femur. Next, the apex (formerly known as the center of rotation angulation or CORA) is identified by locating the intersection of the proximal and distal joint axes (Fig 5).

Figure 5: Proximal femoral and distal femoral anatomic joint angles drawn to identify apex of the deformity
If the intersection is not within the bone or not in an obvious area of deformity, multiple apices are present. This is common in congenital and metabolic deformities (Figs 6 + 7).

Figure 6: Adolescent boy with right posteromedial tibial bowing. Joint angles suggest an apex that is outside of the bone and at a site remote from the more obvious diaphyseal bowing. This confirms a multiapical deformity.

Figure 7: Joint angles in a boy with Rickets reveal an apex of deformity that is not located in the bone or at the obvious deformity revealing a hidden, multi-apical deformity
3. Plan the osteotomy
Once the deformity has been located, the next step is planning the osteotomy. Ideally, the site of osteotomy is at the level of the apex which allows perfect alignment of bone axes and bony margins. Often this is not possible secondary to location of the apex in an area where the biology, stability or anatomy is not suitable for completion and fixation of an osteotomy (i.e. apex is at the level of the joint). The more distant the osteotomy is to the apex, the more obligatory translation will be present after correction. The surgeon must also consider the blood supply, soft-tissue envelope, healing potential, as well as fixation possibilities when determining the level of the bone cut.
The most common osteotomies are closing wedge, opening wedge, or dome osteotomies, each with its own set of pros and cons. Closing wedge osteotomies allow for stable fixation and good healing but require precision with saw cuts and results in shortening of the bone segment. Opening wedge osteotomies can be done through small incisions and require only one cut. These can lengthen the limb but often require bone graft or distraction osteogenesis for healing. These osteotomies also result in elongation of soft tissues which must be considered as delayed wound healing or neuropraxias can occur from undue stretch. Dome osteotomies can be used in the metaphysis and can be constructed so that the deformity correction occurs about an apex that is not located at the level of the osteotomy, such as close to the joint line. These are stable osteotomies and heal well but can be more complex to perform and result in translation at the osteotomy site. Dome osteotomies allow correction of angulation but not rotation.
Once the location and type of osteotomy has been selected, the plan should be tested on pre-operative templates with cutouts or with pre-operative planning software such as TraumaCad (Brainlab, Munich, Germany) or Bone Ninja (International Center for Limb Lengthening, Rubin Institute for Advanced Orthopedics, Sinai Hospital of Baltimore). This allows the surgeon to visualize what the bone margins will look like after correction and confirm that the mechanical axes will appropriately align (Fig 8-10).

Figure 8: “Paper doll cut-out” method of preoperative templating. The radiographs are printed out and cut at the proposed osteotomy site(s). The ‘osteotomies’ are then used to correct the deformity. Once osteotomies are realigned, the MAD is drawn to ensure that the correction resulted in the anticipated correction.

Figure 9: Template overlays can be obtained for commonly used hardware. The radiographs can then be printed out to scale and the templates are then used to accurately perform the osteotomies and simulate fixation.
 Figure 10: Bone ninja software used to analyze deformity and then simulate femoral and tibial osteotomies. The planned final alignment is confirmed with MAD passing through the center of the knee
4. Consider correction strategies
The most common deformity correction strategy is acute correction. Acute correction is appropriate for small magnitudes of deformity and limb length discrepancies. All correction is performed in the OR at the time of surgery and requires precision by the surgeon. Osteotomies are typically fixed with Kirschner wires, plates, screws or intramedullary nails. One must ensure that acute correction does not place undue stress on the neurovascular structures. In acute corrections, rotation and translation are corrected first and then angulation.
Gradual correction is the ideal method for complex deformities. This method is effective in treating deformities that are associated with components of angulation, translation, rotation and/or length discrepancies. In these cases, the osteotomy is performed, and an external fixator is applied, either monolateral or circular. More recently, magnetic intramedullary lengthening nails have become popular for gradual lengthening with or without intra-operative deformity correction. In each case, the deformity is slowly corrected via the external fixator or lengthening nail and the osteotomy heals via distraction osteogenesis. This allows for slow, gentle distraction of the soft tissues which is better tolerated by neurovascular structures. Gradual correction allows for accurate correction of the deformity as the correction can be fine-tuned by adjusting the plan post-operatively. These cases allow early weightbearing and range of motion as well. The disadvantages include burdensome post-operative care by the patient and family and the mandatory rigid adherence to a physical therapy and follow up schedule.
5. Write down your plan
A written plan is vital for completion of a successful limb deformity correction. These complex cases require multiple steps to be performed exactly as planned and in a precise order. A written pre-op plan allows the surgeon to mentally work through the procedure in detail prior to arriving at the operating room (FIG 11).
Figure 11: A detailed preoperative plan

This plan can also be provided to other team members and personnel in the OR. The plan is to be hung on the operating room wall as well so that all parties can understand the steps and follow along increasing the likelihood of a smooth and successful surgical procedure (Fig 12).
 Figure 12: Operating room display of preoperative images, templated corrections and detailed preoperative plan. Now all team members can visualize the plan
This plan should include specifics associated with anesthesia such as blocks and positioning. Specific instruments and implants should be listed and provided to the OR in sufficient time to ensure availability for the surgery. Each step is then recorded and listed in appropriate order so that no step is missed during these complex cases. Displaying the pre-op plan and radiographs demonstrating the anticipated correction is helpful to engage all members of the OR team.
Acknowledgement: The author would like to acknowledge the Rubin Institute for Advanced Orthopedics / Sinai Hospital of Baltimore for use of Figure 4. For anyone interested in limb deformity, we encourage them to consider attending the annual Baltimore Limb Deformity Course (more information available at http://www.deformitycourse.com/)